Easy Way to Raise and Care for Meal Worms
If you buy an item via links on this page, we may earn a commission. Our editorial content is not influenced by commissions. Read the full disclosure.
Raising mealworms is something you need to consider seriously. They make tasty treats for all feathered fowl that you may be raising on your homestead.
Most people raise mealworms for their chickens. I raise ducks and guinea fowl along with chickens, and they all love mealworms plus it is an excellent source of protein.
It takes a small effort but could potentially save you a lot of money.
So if you are interested in learning how to raise more of your poultry's food (even if you don't have a lot of space), this could be the post you've been waiting for.
What You'll Need To Raise Mealworms:
- A plastic 3-drawer storage container. (The containers where the drawers pull in and out.)
- Wire mesh cloth
- A slap stapler
- Oatmeal
- Mealworms
- Potatoes and carrots
- Duct Tape
How To Start Raising Mealworms:
1. Create Your Worms' Perfect Home
Before we start, I want to start off by saying that mealworms are not the red worms that you use for your compost pile or garden. Mealworms are smaller. People often buy them in packaging at feed stores as chicken treats.
I wanted to make that clear before we get started because, honestly, when my husband first brought the idea of raising worms in our living room up to me, my heart sunk.
I was afraid I'd have big, red worms crawling around the house. At the time, I was grossed out until I found out how discrete this process could be done and that I was raising 'smaller' worms.
And so we began raising chicken food in our home.
Let's get you started on becoming part of the 'raising mealworms in your living room' club.
No, seriously, you can actually raise your worms right in your living room, and no one will ever notice.
It's from my own experience.
Crazy, right?
We have been raising them in our living room for well over a year now, and not one person has asked me about our set-up.
They don't even realize it's there.
The worms don't smell and can be stored very discretely.
So how do we accomplish this? With a great little home that doesn't stand out.
You begin building your mealworms a perfect home by going to any general merchandising store and buying a plastic 3-drawer storage container. The storage container where the drawers slide in and out, is the one you will need.
This is where you can purchase the container.
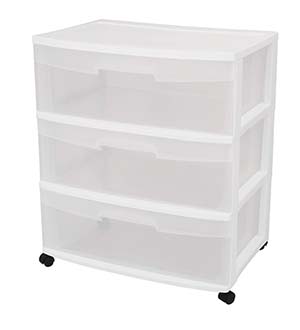
Then, cut the bottoms out of the first two drawers. Once you've cut the bottoms out, place the wire mesh in the now open space. Use a slap stapler to secure the wire mesh.
You need to do this so when the mealworms turn into beetles, they will lay their eggs in these drawers. When they do, the eggs will fall through the wire mesh and be separated easily for you.
You do this to two of the drawers so you can rotate them for optimal usage of all three drawers.
When you purchase your mealworms, you'll start them in the bottom box. When they begin to turn into beetles (which only takes a few weeks) then move them up to the top.
That way when they lay, their eggs will fall through. Keep this rotating process going. When the beetles die, you can allow the other bugs to eat them or clean them out.
Okay, back to what I was saying, after you have their perfect little home built you will need to duct tape each of the drawers. You do this to keep all of the light out of the drawers.
They prefer total darkness, if at all possible.
When this has been done, fill each drawer with oatmeal. We use the instant, quick cooking kind.
You can use organic oatmeal as long as it is the soft kind that breaks down easily. This is what they bury around in.
It is very inexpensive and keeps them quite happy and healthy, which is the ultimate goal. They are like anything else. If you keep them happy, they will lay happy.
So, to recap, here's how to build mealworms house:
- Get a 3-drawer storage container
- Cut the bottoms out of the first two drawers
- Staple the wire mesh on the open space
- Duct tape the drawers to keep the light out
- Fill each drawer with oatmeal
- Start your mealworms on the bottom, move them up when they turn into beetles
Now that you've given them the perfect home, let's move on.
2. What Do Mealworms Eat?
Mealworms are very simple creatures to keep. No wonder people make a living by raising and selling them.
After you have given them the ideal laying and living location, you'll need to know what to feed them.
All they really need is potatoes and carrots. You can give them apples too if you have those on hand. Slice a potato into smaller pieces and lay it in the drawer with them. They'll crawl on it and get all of the water they need by simply doing that.
The same applies to the carrot.

That's it! It doesn't get much easier than that.
We go through our worms about once a week. We'll check to see if the potato and carrot are completely gone or dried out. If either is true, then we simply toss them to the compost pile and add some fresh food.
And they will make your chickens happy and healthy while saving you money.
3. Where Do I Buy Mealworms?
Good question.
They are not hard to find at all. You can buy them here for 1100 mealworms, or here for 500 mealworms. It's true that you can really order just about anything from the internet nowadays—even worms.
Mealworms can be shipped to you in multiple different quantities. I recommend going with what your budget can afford.
If you are able to start off with a larger quantity, just realize that you will have to wait less time to begin feeding your birds.
We started off rather small because we had a smaller budget at the time. It took a few months for them to take off.
So just keep that in mind while ordering. I don't recommend overextending yourself for this project in any way.
Once they are ordered, you'll get them in the mail like a normal package. Be sure to have their home and food ready so you can just place them in their box and let them start multiplying.
The only warning I offer to you about buying mealworms is not to buy 'giant worms.' These have most likely been fed something to make them giant. It probably will not be healthy for your chickens to consume these.
So the basic, run of the mill mealworms is all you need.
That is it. No more, no less. It is a really simple method to take yourself one step closer to being self-sustained.
4. Mealworm Maintenance
After you've had your mealworms for a while, they'll need a little maintenance. When I say a little, I mean very little.
After about 3 months or so, you'll need to dump the mealworms bedding. Be sure to use a sifter so you don't throw any pupae out.
Frass (or mealworm waste) is a great fertilizer for your garden so be sure to save it for that purpose.
You'll need to be sure to keep rotating your drawers every 2-3 weeks to keep up an optimum laying schedule.
That is all there is to raising and maintaining mealworms.
The Benefits Of Raising Mealworms
Mealworms are an ultimate healthy snack for chickens. They are jam packed with protein and something that your chickens absolutely adore (and they will adore you for giving them.)
A few things I have found in raising mealworms are that:
1. Mealworms help you stay away from layer feed
I hate layer feed.
I'm just being honest, but I really do. My husband insists we give it to our hens at the beginning of spring because it helps jumpstart their systems again, and I do it a little begrudgingly.
The reason I hate it so much is because I don't really know what is in it, and it makes my coop stink.
If you feed your chickens a fully natural diet, they will not stink. Their poop literally has next to no aroma.
That is how I like it.
I know I live on a functioning homestead, but I don't want to smell poop every time I walk out my back door, and you don't have to either.
It is all about feeding your animals naturally.
So if you feed your chickens with mealworms, you don't need the added stuff from layer feed because mealworms pack so many nutrients and protein.
That means my chickens are happy and healthy, and I'm a little happier because my coop doesn't stink.
2. Mealworms mean less feed – period
My chickens are not free range. They have a large coop that leads to a chicken 'yard' where they are fenced and can scratch around.
They can't find all the food they need in this yard. Which mean I have to give a supplement.
I feed the chickens weeds and veggies from the garden. I also feed them whole kernel corn, fodder, duckweed, and fermented seeds. We also raise sunflowers to feed them because they love those, and we give them mealworms.
When you up their protein (with mealworms) you begin to notice they eat less from the coop and just scratch around more.
They stay full longer, just as humans do when we eat more protein.
So basically, you can raise something that requires very little work but can save you a ton of money and bring your chickens good health.
Raising mealworms is a great and easy project to take on.
Was this article helpful?
Yes No
Source: https://morningchores.com/raising-mealworms/
0 Response to "Easy Way to Raise and Care for Meal Worms"
Post a Comment